Created by Cameron Jones, minor modifications by Ingbert Floyd
Click here to see the styled version.
What are Cascading Style Sheets?
Cascading style sheets (CSS) are a mechanism by which web authors can define the ways
in which their web content is rendered on the client's machine (browser). HTML by default
offers only a single presentation of web content - which is not necessarily the 'right' one,
nor the one you want to use for your website. Attempts to work around the limitations of
the default HTML presentation are often bulky, limited and insufficient. CSS is a much more
'elegant' way of redefining the presentation of web content without having to reauthor
the HTML web content.
Why use CSS?
- HTML blends content and presentation
- <b> vs. <strong>
- <i> vs. <em>
- <h1> defines a font-size and font-weight
- Etc.
- We should separate content and presentation
- Documents are platform/device independent
- Specify multiple styles for same content
- Varying displays (small displays, accessible displays, non-graphical displays, printable displays, etc).
- Maintainability
- Ease of maintenance, modification
- Specify multiple content pages share same style
- By pointing to style sheets from documents, webmasters can simplify site maintenance and retain consistent look and feel throughout the site. For example, if the organization's background color changes, only one file needs to be changed.
- Ease of making consistency
- Faster downloading
- Better control - more advanced layout
Why isn't everything on the web CSS?
- Many tools for making web pages don't support it very well
- Browser support has been lagging
- Inertia
- Ignorance - many people don't know about them
- Fallacy of small sites/single pages not benefiting from styles
Introduction to CSS
- Well, technically everything is styled --
there is a default style sheet controlling how things like
<h1>, <hr>, <i>, <b>, etc are presented
- Customize and control things like the font weight, italics, spacing, borders, colors, etc
- Can think of styles as an extension of HTML
- Different kinds of styles (inline, embedded, external)
- Style attribute on html tags (inline styles)
- Here is an example:
<p style="font-size:110%;text-indent:10px;color:blue;">
	Hello world
</p>
Here is what it looks like:
Hello world
Here is another example:
<h1 style="border:5px solid red;
			  text-align:center;
			  font-family: arial, sans-serif;
			  font-size:150%;
			  color: #fff;
			  background:#069;">
	A big headline
</h1>
Here is what it looks like:
A big headline
- Can define styles outside of the tags themselves in a <style> tag. (embedded styles)
- How do we indicate which styles are for which elements? Selectors.
Here is an example
<style type="text/css" media="all">
	h3
	{
		color: blue;
		font-style:italic;
	}
</style>
<h3>Example of a simple selector</h3>
Here is what it looks like:
Example of a simple selector
- Finally, we can have styles in a seperate document which is linked in (external styles)
- .css files contain style definitions - basically everything between the <style> tags.
- You can link more than one stylesheet to a single document, and can share stylesheets across multiple documents
Linking external stylesheets:
	<link rel="stylesheet" href="stylesheet.css" type="text/css" />
or
	<style type="text/css" media="all">
		@import url(stylesheet.css);
	</style>
Media Types
CSS also allows you to define particular styles based on the
media of the client (type of display). So, people on mobile phones,
blind people, etc. can download different stylesheets for your page
to present them in different ways. Here are the media types defined
by W3C:
- all
- aural
- braille
- embossed
- handheld
- print
- projection
- screen
- tty
- tv
Can define styles for particular media, or import entire stylesheets depending on the media.
@all h2
{
	//style defined for all media
}

@screen p
{
	//paragraph for screen media
}

@aural img
{
	//style for how to present images to a screen reader
}

//import the default css for screen presentation
@import url(default.css) screen;

//a braille reader should use the braille css
@import url(braille.css) braille;

//mobile device users should get a stripped down css.
@import url(mobile.css) handheld;
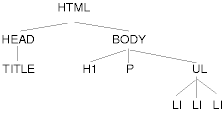
Document Tree Model or Why Cascading Style Sheets are "Cascading"
HTML documents have a hierarchical tree structure. HTML tags are nested within
other tags, forming a hierarchical structure of the tags. For example, this HTML document (from W3C)
<!DOCTYPE HTML PUBLIC "-//W3C//DTD HTML 4.0//EN">
<HTML>
  <TITLE>My home page</TITLE>
  <BODY>
    <H1>My home page</H1>

    <P>Welcome to my home page! Let me tell you about my favorite composers:</P>
    <UL>
      <LI> Elvis Costello </LI>
      <LI> Johannes Brahms </LI>
      <LI> Georges Brassens </LI>
    </UL>

  </BODY>
</HTML>
Has a tree-structure that looks like this:
- Style definitions propogate 'down' the tree, from the top to the bottom.
- Styles applied at an element in the tree, holds for the elements in the subtree beneath it.
- Styles defined at lower levels can override the style imposed from above.
- Changes made in styles at lower levels do not effect the styles at higher levels.
- So, what does this mean?
- To change the font for the entire document - just change the font on the <body> tag.
- You can change the paragraph tag's style without affecting how the list items are displayed
- etc.
- Also, successive stylesheets can redefine styles from previous sheets.
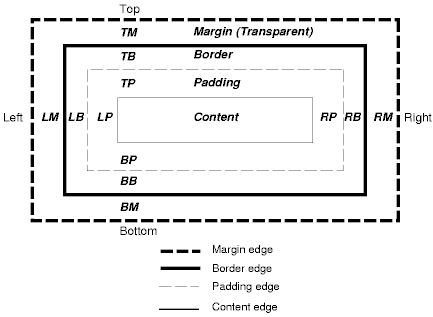
The CSS Box Model
Before going any further, we need to understand what is happening with these styles and
elements. CSS utilizes a box model to represent every element in an HTML document. Each
element is represented as a box containing content. The boxes can be strung together either
in inline or in block layout to construct the HTML rendering.
Here is what a box looks like, conceptually (From W3C):
We can control all of these properties with stylesheets, to customize the look and feel
of each element in the HTML document. Every tag has these properties. For more information on the box model check out the following links:
Selectors
CSS has a lot of power and flexibility in allowing you to select which elements you want styles to apply to. You can select elements by their name (h1, h2, p, etc), their class (based on a value you put in the class attribute), a combination of the two, their id, their hierarchical position, and many others. Here are some basic examples using this document as source.
//select all divs AND paragraphs
div, p
   ^ comma

//select only the divs which are of class 'section'
div.section
   ^ period

//select paragraphs inside of divs
div p
   ^ space

//select images inside of divs
div img

//select divs inside of section-divs
div.section div

//select anchors
a

//select links
a:link

//select links when they are moused over
a:hover

//select active (clicked) links
a:active

//select visited links
a:visited
CSS Properties
Some common properties you can control in CSS include:
| Property |
Description |
Values |
| color |
The foreground color |
aqua, black, blue, fuchsia, gray, green, lime,
maroon, navy, olive, purple, red, silver, teal,
white, and yellow or hex value (#rrggbb, #rgb, rgb(x,x,x)) |
| background |
The background color |
Color value or image URL |
| font-family |
The font style to be used |
Font group name, eg. 'arial, helvetica, sans-serif' |
| font-weight |
Boldness |
'normal', 'bold', 'bolder', 'lighter' |
| border |
Border width, style and color |
Width (usually in pixels), style (solid, dashed, dotted), color value |
| margin |
The margin around the element (space between it and another element) |
Margin width |
| padding |
The padding inside the element (space between content and the edge of the element) |
Padding width |
Playtime
Look at some of the following sites. Check out their stylesheets.
Pick a page of your own and save it to your computer. Open the stylesheet
and start tinkering.
In your browser, select "Save Page As" option and download the complete page (including images
and CSS) open up the saved page in your browser and open the css in a text editor.
Start making changes to see how they effect the output. Try deleting everything in the css
(save a backup first). What does the page look like without any styles?
For More Info
Submission
This Lab should be submitted to your GSLIS I: drive. Please create a new folder in your courseweb_html directory, and place all the files of the lab in this new folder.
To submit your Lab, upload 4 versions of the HTML + stylesheet of the page you chose to edit. The HTML should be identical on each version. The stylesheets should be the only thing that change. Each version should have a significantly different look and feel. Changing the style of one header is not sufficient, for example. One version of the page must have a blank stylesheet. Do not try to validate these 4 versions of the page you have downloaded unless you have time to spare, and want to get better at your HTML. I strongly suggest that you put each version of the HTML in separate folders (directories). This will help you keep track of the different versions, and which files belong with which version.
Then submit a brief writeup as an HTML document in the standard form required for this class. In the writeup, explain what you did with each of the 4 versions, what you learned from the changes you made to each version, etc. This can be either in essay or in bullet point form, but I require enough explanation so that you demonstrate what you have learned. Please provide links in your writeup to each version of the page you saved. The HTML for your writeup must validate against XHTML 1.0.
Because some students have been pushing the line as far as what they write for their answers, there must be 100-250 words devoted to each version of the page. Thus, the total writeup must be at least 400 words.
Grading
Out of 25 points total:
- 2 points per page version (8 points total)
- 3 points per explanation of each page (12 points total)
- 4 points for the quality of the HTML in the writeup: these points will be awarded for both page organization and for the validity of the XHTML.
- 1 point for including a validation link.